
When you are building an integration, you will often need to receive a webhook directly on your local machine: to test a Telegram bot, verify a GitHub webhook, debug a payment callback, or inspect the exact HTTP request sent by an external service.
The problem is that a local application is usually only available at an address such as http://localhost:3000. An external service cannot send a request there: localhost exists only on your computer, and you may not have a public IP address, a configured server, or an open inbound port at all.
In Adal, webhooks are received through servers. A server accepts a public HTTP request, stores its history, and forwards it to a connected local application through Adal CLI. There is no need to open ports on your router, configure NAT, or deploy a temporary server.
What you will have at the end
Once configured, you will have a permanent public URL for your Adal server. You can use it in GitHub, Telegram, Stripe, GitLab, Shopify, or any other service that sends HTTP webhooks.
When an external service sends a request:
Adal receives it through a public HTTPS URL.
The request appears in the server history.
Adal CLI forwards it to your local application.
Your local handler receives the webhook as though the request had arrived directly from the internet.
Your application continues to run on localhost, while your computer remains inaccessible from the public internet.
What you need
Before you begin, make sure you have:
an Adal account;
Adal CLI installed;
a local application running;
an HTTP handler that can receive incoming requests.
For the examples below, assume that your application is running at:
http://localhost:3000
And that the webhook server should be handled by this route:
http://localhost:3000/webhooks/github
Step 1. Create a server in Adal

Open the Adal dashboard and create a new server.
When creating a server, choose:
the region where incoming webhooks should be received;
a clear name, such as
Local GitHub development;the allowed HTTP methods;
optionally, a note describing the integration that uses the server.
After the server is created, Adal provides it with a permanent public address. It will look similar to this:
https://your-server-id.se1.adal.cloud
The server ID is generated automatically, remains assigned to that server, and is never reused after the server is deleted.
When you create the server, Adal also displays a token for connecting Adal CLI. The token is shown only once, so save it before closing the page. If you lose it, you can generate a new token later.
You will use the public server URL as the webhook delivery address in the external service.
Step 2. Add a local destination
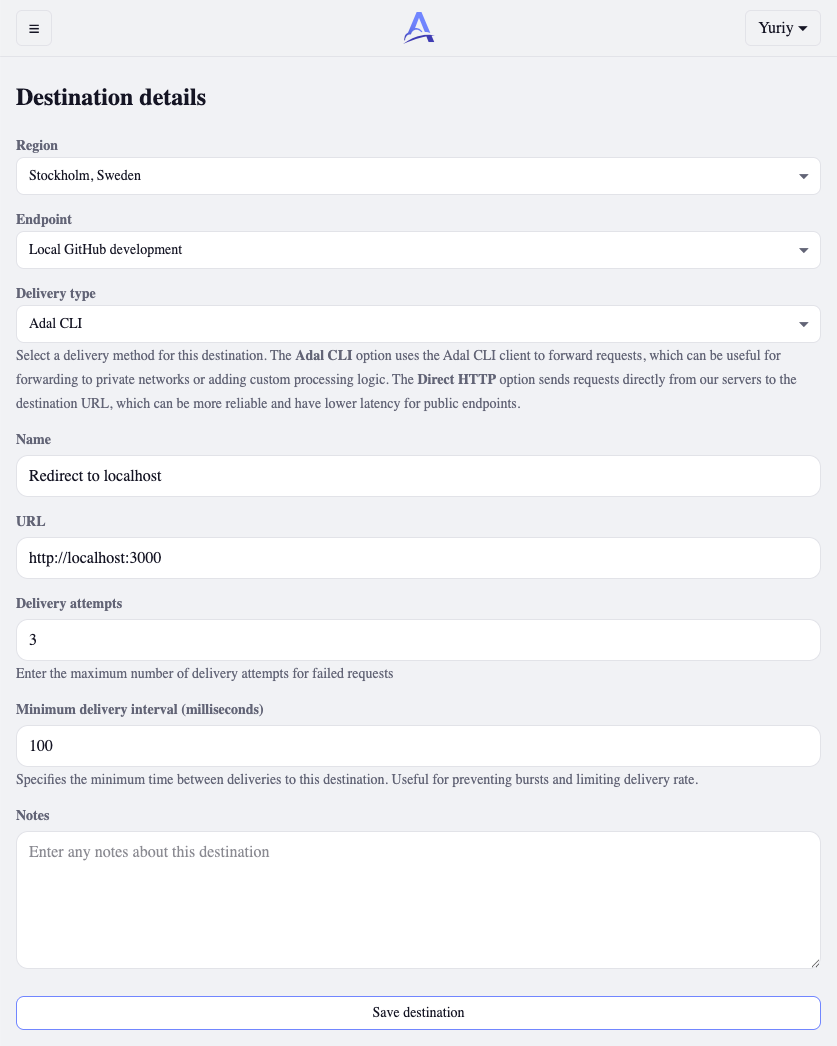
A server receives requests from the internet, but it does not know where to send them by itself. In Adal, a destination defines where a server should deliver a webhook.
Create a destination for your local application and enter the address of your local server:
http://localhost:3000
Adal preserves the path and query parameters from the original request. For example, if an external service sends a webhook to:
https://your-server-id.se1.adal.cloud/webhooks/github?source=test
your local application receives it at:
http://localhost:3000/webhooks/github?source=test
In most cases, you only need to set the root URL of your local application as the destination. Keep the specific webhook path in the URL you configure in the external service.
Step 3. Connect Adal CLI
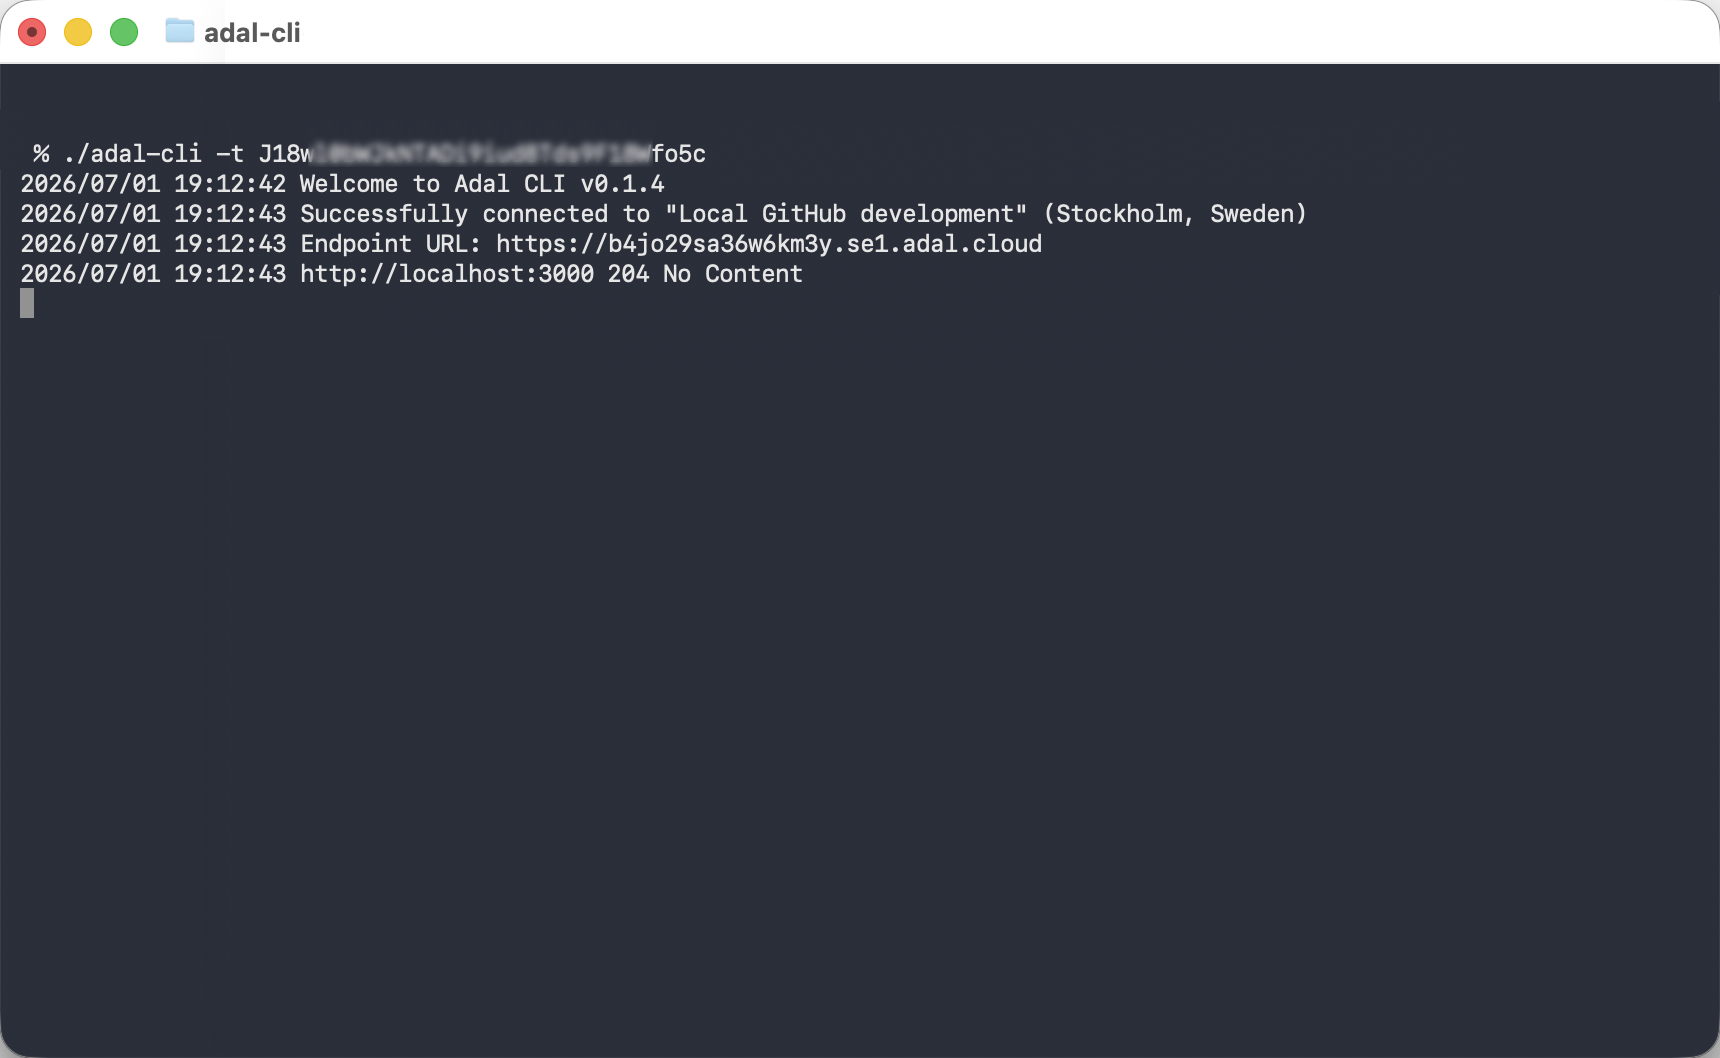
For Adal to deliver webhooks to your computer, your local application needs to be connected through Adal CLI.
Run the CLI on the computer where your application is running and use the token generated when you created the server. For example:
adal-cli --token a1b2c3
Or using the short option:
adal-cli -t a1b2c3
After it connects successfully, the CLI maintains a secure connection to Adal. Your machine does not need an open inbound port: the connection is initiated from your computer, and Adal uses that established connection to deliver webhooks.
Keep the CLI running while you are testing the integration.
When the CLI is connected, the destination becomes available for delivery. If the connection drops temporarily, Adal stores accepted webhooks and can deliver them after the connection is restored, according to the server settings and retry rules.
Step 4. Configure the server URL in the external service
Now copy the public server URL from Adal and add the route used by your webhook handler.
For GitHub, it could look like this:
https://your-server-id.se1.adal.cloud/webhooks/github
For Telegram:
https://your-server-id.se1.adal.cloud/webhooks/telegram
For your own application or a test request sent with curl:
https://your-server-id.se1.adal.cloud/webhooks/test
Depending on the platform, this URL may be called a webhook URL, callback URL, event server, or delivery URL.
Do not use localhost, 127.0.0.1, or a private network IP address in the external service configuration. Those addresses are only accessible from your own computer or local network.
Step 5. Test webhook delivery
You can send a test HTTP request yourself:
curl -X POST "https://your-server-id.se1.adal.cloud/webhooks/test" \
  -H "Content-Type: application/json" \
  -d '{"event":"test","message":"Webhook received locally"}'
After sending the request, check three places:
The server history in Adal. The accepted request should appear there.
The delivery history. It shows whether delivery to your local application succeeded.
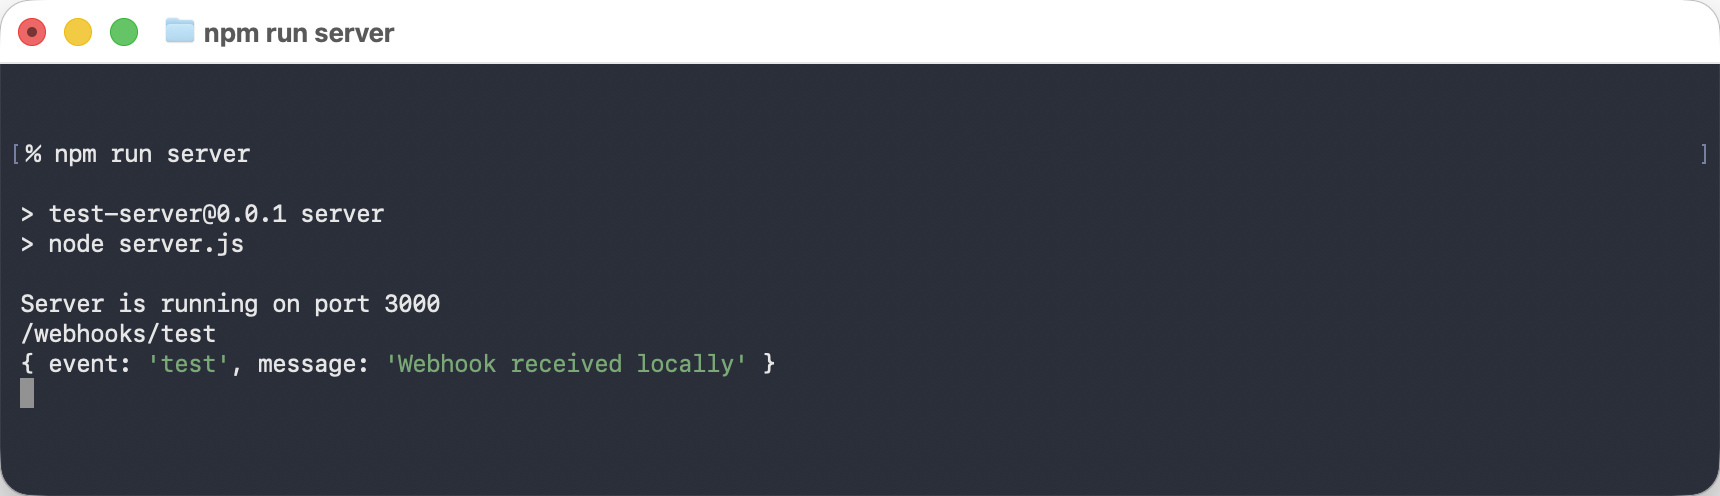
Your local application logs. They should show an incoming request to
/webhooks/test.
If everything is configured correctly, your application receives this JSON payload:
{
  "event": "test",
  "message": "Webhook received locally"
}
How it works
The request flow without a public IP address looks like this:
External service → public Adal server → Adal CLI → localhost
The external service sends a webhook to Adal’s public HTTPS URL. Adal accepts the request, records the result, and forwards it to your local application through the connected CLI.
Your computer does not accept direct inbound connections from the internet. You do not need:
a public IP address;
a VPS for temporary testing;
router port forwarding;
NAT configuration;
an open firewall port;
a separate domain for local development.
This is especially useful when you work from home, use mobile internet, are behind a corporate network, or rely on CGNAT or standard Wi-Fi where inbound connections are unavailable.
Working with multiple webhook providers
One server can receive requests for multiple routes within the same local application:
https://your-server-id.se1.adal.cloud/webhooks/github
https://your-server-id.se1.adal.cloud/webhooks/telegram
https://your-server-id.se1.adal.cloud/webhooks/stripe
Your local machine receives them at the corresponding routes:
http://localhost:3000/webhooks/github
http://localhost:3000/webhooks/telegram
http://localhost:3000/webhooks/stripe
This is useful when one project integrates with several external services.
For separate projects or environments, it is usually better to create separate servers. For example:
Local development
Local staging
Telegram bot development
GitHub App testing
Payment callback development
This makes it easier to separate request histories, access settings, limits, and delivery destinations.
What happens when your local application is offline
If Adal CLI is disconnected or your local application is temporarily unavailable, the webhook is not immediately lost.
Adal stores the accepted request and records delivery attempts. Once the CLI or local service becomes available again, the request can be delivered again according to the server settings and retry rules.
This is different from configuring a direct webhook URL on your local machine. With a direct connection, the external service simply cannot reach your computer. In Adal, the incoming webhook is accepted by the server first and then delivered to its destination.
How to receive webhooks securely
A public server URL is necessary so that an external service can send events to it. However, having a public URL does not replace webhook verification inside your application.
You should validate the signature provided by each webhook provider. For example:
GitHub uses the
X-Hub-Signature-256signature;Stripe uses the
Stripe-Signatureheader;Telegram supports a secret webhook token;
many services send their own secret in a header or query parameter.
Signature verification should happen in your local webhook handler before the event is processed. Adal delivers the request to your application, but your application logic should still verify that the request came from the expected provider.
You should also avoid publishing your server URL unnecessarily. If the URL is exposed to an unintended audience, create a new server and update the webhook URL in the external service.
Common issues
The external service does not accept the webhook URL
Make sure you are using the complete HTTPS server URL:
https://your-server-id.se1.adal.cloud/webhooks/provider
Some services do not accept http:// URLs, addresses without TLS, or private IP addresses.
The webhook appears in Adal but does not reach the local application
First, confirm that Adal CLI is running and connected. Then check that the destination is attached to the correct server and points to the correct local address.
Also verify the local route. If the request is delivered to:
/webhooks/github
your application must have a handler for that exact path.
The local application returns 404
This means that the webhook was delivered successfully to your local machine, but the route does not exist in the application itself.
Check:
the path after the server domain;
the route configured in your application;
the HTTP method;
reverse proxy settings, if you use Docker, Nginx, or another local proxy.
The local application returns 401 or 403
This is usually caused by authentication middleware, CSRF protection, or webhook signature validation.
Webhook routes should normally be accessible without a user session, while still validating the signature from the specific webhook provider.
Webhooks stop arriving after restarting the computer
After a restart, start both your local application and Adal CLI again. The server and its public URL remain unchanged, so you do not need to update the webhook URL in the external service.
FAQ
Can I receive webhooks on localhost without a public IP?
Yes. An Adal server receives the webhook through a public HTTPS URL and forwards it to your local application on localhost through Adal CLI.
Do I need to open a port on my router?
No. Receiving local webhooks through Adal does not require port forwarding, NAT configuration, or a public IP address.
Can I use one server for multiple webhooks?
Yes. One server can receive requests on multiple paths, such as /webhooks/github, /webhooks/telegram, and /webhooks/stripe. Adal forwards them to the matching routes in your local application.
Does the server URL remain the same after restarting Adal CLI?
Yes. The server URL is permanent and does not change when you restart your computer, Adal CLI, or the local application.
Can I inspect the webhook body before my application processes it?
Yes. The server history lets you inspect accepted requests and delivery results. This is useful for debugging payloads, HTTP headers, response statuses, and retry attempts.
Conclusion
Receiving webhooks locally without a public IP does not require exposing your computer to the internet. In Adal, you create a server with a permanent HTTPS URL, connect it to a local destination, and use Adal CLI to forward incoming requests to localhost.
You configure the server URL in your webhook provider, continue developing locally, and keep a complete history of requests, deliveries, and errors in one place.